This guest blog comes from Myranda Hausheer, a Colorado adventurer and content creator. Follow her adventures on social here.
The 4PL is an iconic backpacking trip located near Aspen, Colorado. I was lucky enough to get permits and complete this hike July 7-10, 2024 with a couple of friends. The logistics of this hike can be challenging, so I wanted to create a blog post with all of the information you will need to “know before you go”.
A couple of the most important things you can do, prior to the hike, are take the Aspen Pledge and make sure you’re well informed on all Leave No Trace principles.
By signing the Aspen Pledge, $18.80 will be donated to either the Independence Pass Foundation or the Roaring Fork Outdoor Volunteers as the beneficiary organization. The Aspen Chamber has committed up to $50,000 in donations so let’s help them donate as much money as possible to these wonderful organizations.
Background:
I have been wanting to do this bucket list trip for years, but the only problem is I didn’t start backpacking until this summer. I am very confident and prepared when it comes to day hikes, but I didn’t want to do this backpacking trip solo. I went on a one-nighter, prior to this trip, to test out my gear and get comfortable with my pack and the weight. I also went with a friend on that trip. I did the 4PL with two friends who are much more experienced backpackers and are both very cautious and safe.
Four Pass Loop Overview:
The 4PL is located in the Maroon Bells-Snowmass Wilderness near Aspen, Colorado and Crested Butte, Colorado. It is 28 miles round trip and is typically hiked over the course of 4 days and 3 nights, which is what we did. Each day hike is between 6-9 miles long, with significant elevation gain, at high elevations. If you plan to hike the loop in less than 4 days, then use the campsites guide from the Forest Service to decide where to camp. I would personally advise against doing the loop in less than 4 days, until you’re a very fit backpacker. Our group is all in great shape and 4 days was plenty fast, for all three of us. If you want to add on optional side trips to Geneva Lake and Willow Pass, you may want an extra day.
During this hike, you will climb over four mountain passes, which is why it’s called the Four Pass Loop. The hike traverses these mountain passes: West Maroon Pass (12,500ft), Frigid Air Pass (12,408ft), Trail Rider Pass (12,420ft), and Buckskin Pass (12,462ft).
The hike starts around 9,580 feet and the passes top out around 12,500 feet high. You will gain around 8,000 feet of elevation, throughout the entire loop. The best time to hike the 4PL is in July through September. Snowmelt varies each year, which can impact the time you can adequately access this hike. It can snow starting in mid-late September, so keep a very close eye on the weather.
Quick Trail Stats:
- Distance: 28 miles long
- Elevation Gain: 8,000 feet
- Starting Elevation: 9,580 feet
- Highest Elevation: 12,500 feet
- Hiking Permit Cost: $10 per person per night with a $6 processing fee
- Parking Permit Cost: $10 for a 60 hour (2 night) reservation
- Camping Zones: https://www.fs.usda.gov/sites/nfs/files/r02/whiteriver/publication/MBSW%20Permit%20Zone%20Map.pdf
- We camped in: Maroon (night 1), North Fork (night 2), and Snowmass (night 3)
- AllTrails: https://www.alltrails.com/ar/trail/us/colorado/four-pass-loop--5
- Hiking permit: https://www.recreation.gov/permits/4675333
- Parking permit: https://aspenchamber.org/plan-trip/trip-highlights/maroon-bells/reservations
- Shuttle information: https://www.rfta.com/routes/maroon-bells/
- Campsite locations: https://www.recreation.gov/permits/4675333
- Four Pass Loop Facebook group (this has the most up to date trail reviews): https://www.facebook.com/groups/581773065256376
Permit Release Dates:
- February 15, 2026: Overnight permits for April 1-July 31 2026 are available for advanced reservation at 8am Mountain Time
- June 15, 2026: Overnight permits for August 1-November 30 2026 are available for advanced reservation at 8am Mountain Time
- October 15, 2026: Overnight permits for December 1 2026-March 31 2027 are available for advanced reservation at 8am Mountain Time
Parking Information:
Overnight parking reservations are required for the Maroon Bells Snowmass Wilderness from May 15-October 31, 2026. Parking at Maroon Bells is the easiest way to hike the 4PL. You will want to get overnight parking, which is a 2 night parking reservation. Depending on how many days you’re planning to do the loop, you may need more than one overnight parking reservation. Your visit will start at 6:00 AM the day you reserve, and you must arrive before 8:00 AM or after 5:00 PM, and depart by 6:00 PM, 60 hours later.
If you cannot get a parking permit then you will need to park at Aspen Highlands and catch the shuttle. You could also pick one of the parking garages in town, use the RFTA bus system to get to Aspen Highlands, and take the shuttle from there.
Book parking permits & reservations: https://aspenchamber.org/plan-trip/trip-highlights/maroon-bells/reservations
RFTA bus link: https://www.rfta.com/routes/maroon-bells/
Know Before You Go: Bear Bins
You must store food, trash, and any scented items (chapstick, sunscreen, toothpaste, trash, etc) in an IGBC approved bear resistant container. Human food habituated bears are a threat to human safety. Visitors without approved bear resistant containers will be ticketed and required to leave.
I carried this bear canister on the trip which was the perfect size for me, for 4 days and 3 nights. I brought a couple extra backpacking meals because I wasn't sure how hungry I would be and I also had a full size spray sunscreen.
You want to put the bear bin at least 100 feet from your campsite. Make sure it’s on flat, level ground, avoiding bodies of water, so it doesn't roll downhill or into the water, in case a bear knocks the canister around.
Article on bear canisters: https://www.fs.usda.gov/sites/nfs/files/r02/whiteriver/publication/Bear%20Resistent%20Canister%20Fact%20Sheet%202025.pdf
Know Before You Go: Lightning Danger
The weather can rapidly change in the mountains, especially when you’re above treeline (approximately 11,500 feet here in Colorado). One of the biggest risks is not being prepared for changing weather - from rain, hail, snow, to extreme temperature swings. Colorado ranks fourth in the nation when it comes to lightning fatalities, so this is something to be aware of.
Thunderstorms (with lightning) are common from June through September. Each lightning flash can potentially cause serious injuries or death. It is important to understand the dangers of thunderstorms and lightning, so that you can get to a safe place, especially when you’re recreating outdoors.
During a thunderstorm, you can hear thunder about 10 miles from a lightning strike. Since lightning can strike outward 10 miles from a thunderstorm, if you hear thunder, you are likely within striking distance from the storm. If you’re hearing thunder, you should seek shelter. If you are caught outside, stay away from open areas, high ground and water. Never stand under a tall, isolated tree.
What to do if you’re above treeline in a thunderstorm:
- Quickly move to lower elevation. Ideally shelter below treeline at the base of a cluster of low elevation trees.
- Gullies are safer than exposed ridge lines.
- Do not shelter under isolated trees (since they’re the tallest object).
- Avoid wide open areas.
- Avoid streams, rivers, wet gullies, and boggy ground.
- Do not shelter in a cave or near rocks since they can conduct electricity.
- When camping inside a tent, keep in mind that a tent has metal poles and can conduct electricity.
- Do not lie flat on the ground. Lying flat increases your chance of being affected by potentially deadly ground current.
- Assume the lightning position by crouching down. If possible, sit or crouch on top of a backpack, to reduce your direct contact with the ground. Put your hands behind your head and bend forward. Look for and stay away from any objects that could conduct electricity, like tall trees.Shelter for at least 30 minutes after you hear the last sound of thunder.
Here are some resources to check the weather: Mountain Forecast, Highpoint Weather, Open Snow, or NOAA click point forecast.
This is a great article on lightning safety: https://www.nps.gov/romo/planyourvisit/lightning-safety.htm
Know Before You Go: How to Poop in the Woods
When you’re hiking the 4PL you will either need to dig a cathole or carry a WAG bag. It is your responsibility to dispose of waste properly, so this area can be enjoyed for years to come.
Here’s how to properly dig a cat hole:
- Find a location that is at least 200 feet away from water (rivers or lakes) and away from the trail. If possible, locate your cat hole where it will receive maximum sunlight. The heat from the sun will aid decomposition. Avoid runoff paths that could potentially contaminate water sources.
- Dig a hole 6-8 inches deep and 4-6 inches in diameter (the PACT outdoors kit has a 6” marker on the shovel)
- Do your business
- Push toilet paper to the bottom of the cathole with a stick, or carry it out. Do not leave it on the ground.
- Cover and disguise the cat hole with natural materials (soil, leaves) when finished.
- PACT outdoors kit: https://rei.rockporch.com/prdlink/QAD4Ztwk8n
- WAG bag: https://rei.rockporch.com/prdlink/vfA555iYlI
Leave No Trace: how to dispose of human waste: https://lnt.org/why/7-principles/dispose-of-waste-properly/#:~:text=Deposit%20solid%20human%20waste%20in,out%20along%20with%20hygiene%20products
Know Before You Go: Weather
We went July 7th-10th and the weather was great. Daytime highs were in the 70’s and the nighttime lows were in the 30’s-40’s. Typically there are some afternoon thunderstorms, so prepare to have a rain jacket, layers, and a rain fly for your tent.The storms are usually short lived.
If you’re going in late June (not recommended) or early July, your main concern will be the snowpack. It was pretty high into July, which we were concerned about. Thankfully it melted enough, there were multiple trail reports (via the Facebook group and AllTrails) saying you didn’t need microspikes, so we felt totally comfortable doing it. You can also call the rangers a week or so before you are supposed to hike.
Know Before You Go: Altitude Sickness
Altitude sickness can occur when you're in the mountains especially when you're coming from a much lower elevation, which is common for the 4PL. Altitude sickness can happen when you move to a higher altitude too quickly. The more you ascend in elevation, the less oxygen is in the air. When you are experiencing altitude sickness it means your body is having trouble adjusting to how much oxygen you're getting with each breath.
Altitude sickness is usually preventable and treatable but when it's severe, it can rapidly turn into a life threatening concern. The symptoms of AMS usually appear within the first day or so of reaching a high altitude. More severe forms like HAPE or HACE take longer to appear, usually between two and five days. Altitude sickness can become deadly if AMS turns into HAPE or HACE. HAPE can be deadly within 12 hours. HACE can be deadly within 24 hours. Learn how to recognize the early signs and know when to descend or cut your trip short.
There are 3 kinds of Altitude Sickness:
- Acute mountain sickness (AMS): this is the mildest and most common form of altitude sickness.
- High altitude pulmonary edema (HAPE): this is when altitude sickness affects your lungs, causing them to fill with fluid. This is a medical emergency that needs immediate medical attention. While not the most severe form, it can cause death faster than other forms of altitude sickness.
- High altitude cerebral edema (HACE): this is the most severe form. It happens when altitude sickness causes your brain to swell. This is a very dangerous condition that needs emergency care.
Symptoms of altitude sickness (AMS) can include:
- Headache (the most common symptom)
- Nausea or vomiting
- Loss of appetite
- Fatigue and weakness
- Dizziness or lightheadedness
- Insomnia or trouble sleeping
- Shortness of breath
- Swelling of the hands, feet, or face
- Fatigue (even when resting)
- Vision changes (these are rare and usually indicate more severe altitude sickness, due to blood vessel ruptures in your retinas).
How to treat altitude sickness:
- Stop and acclimate: stopping and resting is the best thing to do when you first notice the signs of altitude sickness. Once you reach over 8,000 feet elevation, you are more likely to get altitude sickness.
- Descend: if symptoms are more severe (dizziness, fatigue, or nausea) or get worse, descending is a top priority. Most experts recommend descending until the symptoms get better. This usually involves a decrease of at least around 900-1,000 feet and as much as 3,000 feet until symptoms get better.
- Supplemental oxygen: breathing higher concentrations of oxygen can help offset some of the symptoms of altitude sickness.
- Medications: certain medications (acetazolamide, dexamethasone or nifedipine), can treat altitude sickness and delay more severe symptoms or complications.
- Please immediately consult a doctor if you're concerned about altitude sickness in yourself or anyone else in your group.
Know Before You Go: Dogs
You are allowed to bring your dog on the 4PL, but they must be leashed at all times. This protects other visitors and wildlife. When recreating in the Maroon Bells area, please be aware that dogs are not allowed on the Scenic Loop Trail due to moose interactions.
Here are some things to consider when thinking about bringing your dog on the 4PL.
Know Before You Go: Wildlife Safety
Wildlife safety is typically a concern for most hikers, myself included. I always carry bear spray with me because it makes me feel safer and is very effective. You do need to carry it on the front of your pack though because if you ever have to use it, you will likely only have seconds to react, and will not have time to dig it out of your pack.
Here are some black bear safety tips: https://www.instagram.com/p/C6IHQPQsXRx/
Here are some moose safety tips: https://www.instagram.com/reel/C83Xv37sgU-/
Here are some mountain lion safety tips: https://www.instagram.com/reel/C6Xe1CEsfP-/
Four Pass Loop: Day One
July 7, 2024
Link to carousel post: https://www.instagram.com/p/C9Y65KOsJBf/?img_index=1
Link to carousel post: https://www.instagram.com/p/C9abjMHPL6G/?img_index=1
The 4PL has been on my bucket list for years. The only problem? I didn’t backpack until this summer. Doing the 4PL as my second backpacking trip was a little ambitious, and not something I would necessarily recommend to others. But, I was confident in myself since I’m used to hard hikes and frequently solo hike. I also went with two other friends who are more experienced in backpacking. They’re both really safe, so I felt great about our group!
On the morning of 7/7, I picked the other girls up from a parking garage in Aspen, and we headed to the trailhead. I had overnight parking passes for Maroon Bells, and you have to be at the trailhead before 8am, when the shuttle starts. You need a parking permit in addition to a hiking permit (with designated camp zones). We did the trip clockwise in 4 days and 3 nights, which was perfect for our group.
I wasn’t fully sure what to expect on this hike. I’ve basically only heard about how hard it is but I didn’t expect it to be as beautiful as it was. It was much more beautiful than I could’ve imagined!
You will start the hike at the Maroon Lake Trailhead. Make sure to fill your hydration bladder prior or you can filter water from Maroon Lake. You will follow the Maroon Snowmass Trail #1975 along the shore of Maroon Lake. You will start the hike off by seeing the infamous views of Maroon Bells, nestled behind Maroon Lake.
Once we got to the trailhead, we took some photos at Maroon Lake, then later on at Crater Lake, and headed on our way!
Around 1.7 miles into the hike, you’ll reach the junction for Crater Lake. You will go left and follow the West Maroon Trail #1970, which ultimately leads up to West Maroon Pass. Campsites begin around 3 miles into the trail, but we kept hiking, so we were closer to West Maroon Pass.
The first part of the hike was moderate. You will be walking through aspen groves, rocky areas, through forests, and willow bushes. There were two river crossings that we heard were rough, but I’m 5’5” and they didn’t even come up to my knees. Trekking poles and sandals were needed for the water crossings, though.
As we headed towards West Maroon Pass, the elevation gain started to pick up, and we looked for somewhere to camp. The total elevation gain from the trailhead is approximately 2,920 feet and it’s much steeper as you head towards the top of West Maroon Pass.
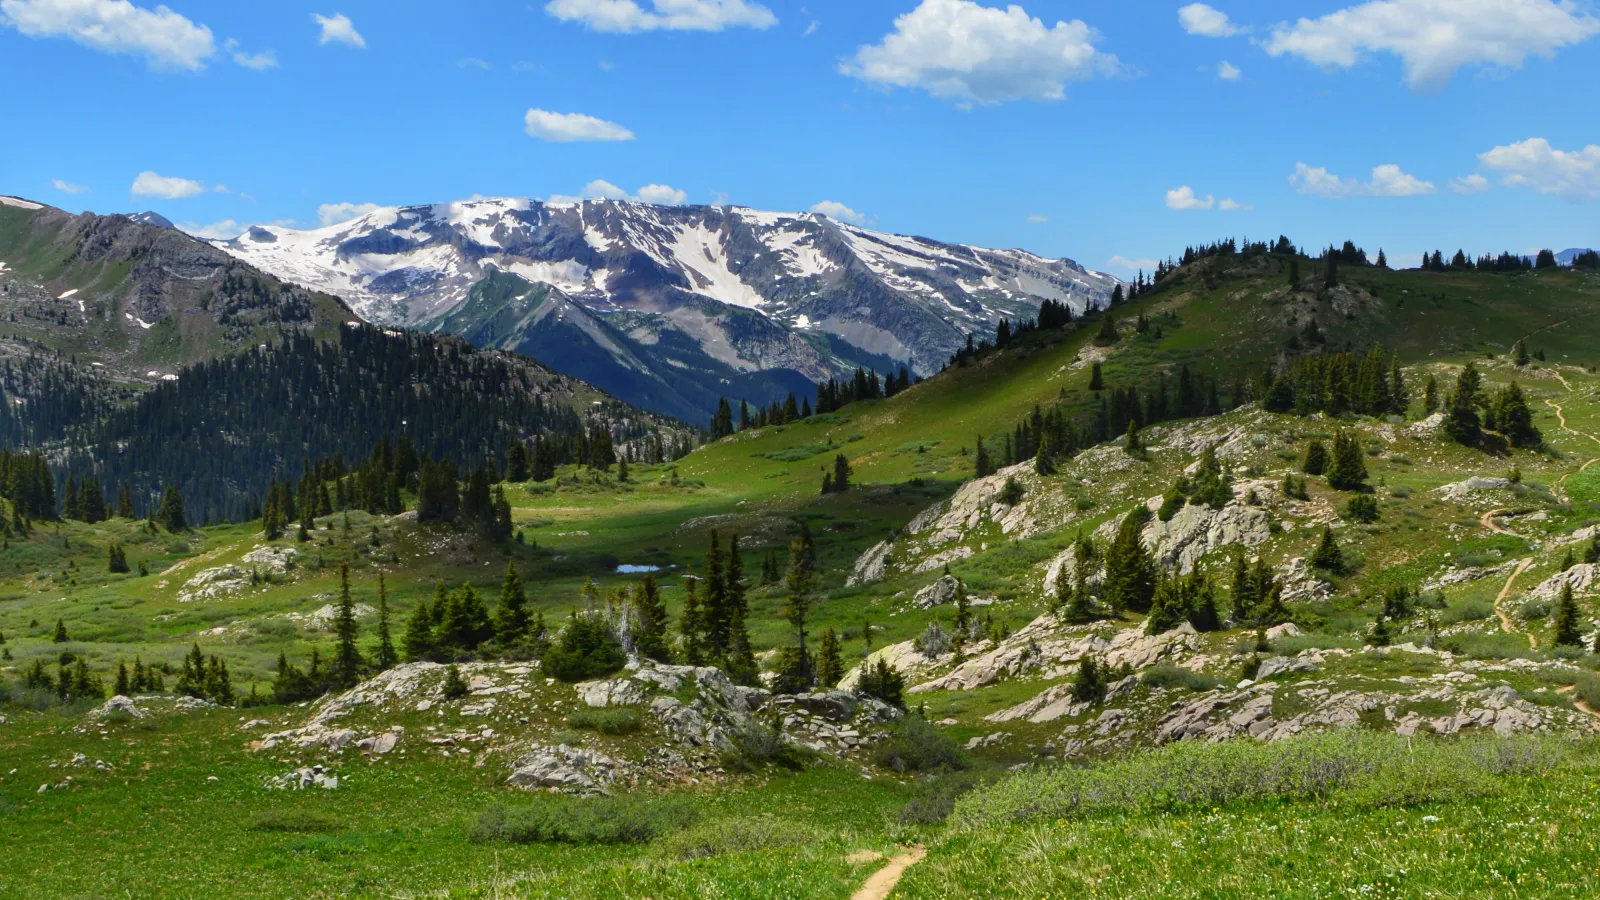
Heading towards West Maroon Pass was beautiful. Everything in the valley was so lush and there were a lot of streams from the snow melt. Thankfully, that made it really easy to find water to filter. I carried around 1.5L-2L of water instead of my typical 3L. This is one of my favorite times of the year to hike - the patches of snow were beautiful against the vibrant landscape and colorful rocks. The mountains, rocks, and peaks were all so varied in color, texture, and shape. The wildflowers were beautiful - especially the Columbine and Indian Paintbrush. The alpine tundra flowers were also thriving.
I definitely recommend Gore-Tex shoes, since the trails were wet from runoff and there was mud. We saw a trip report about “suck your boot off mud” but thankfully, we never encountered mud that was that bad.
Make sure to turn around occasionally to see the views of the valley. We got to a beautiful spot that night and I think it will be one of the prettiest spots I’ve ever camped (mostly because I prefer car camping).
That night we relaxed, chatted, and enjoyed the views. We also played a game of “surprise” aka we all brought a surprise to share. McKenzie brought sourdough bread, Holly brought cheese, cherries, meat, and snap peas, so we had a little charcuterie “board”. It was honestly amazing. I brought Uno, but we were all so tired by the time we got to camp each night, that we never played.
That night, I got the worst night’s sleep of the trip, and thankfully I didn’t know how bad it was until we got back into service (and my Garmin synced). I only got 3.5 hours of sleep with multiple wake ups. That is one thing that I really am not a fan of. I love my car camping set up and am much more comfortable in there. Was it worth it? Yes, but I will absolutely not be turning into a thru hiker.
Four Pass Loop: Day Two:
July 8, 2024
Link to carousel post: https://www.instagram.com/p/C9h-qmMxNnZ/?img_index=1
Link to carousel post: https://www.instagram.com/p/C9lV3xEs7_L/?img_index=1
On day two, you will ascend over West Maroon Pass and Frigid Air Pass. Both passes have spectacular views and the hike is around 7 miles long. Frigid Air Pass is steeper and felt harder than the climb up West Maroon Pass. Overall, day two ended up being the easiest day of the trip. The final 1 mile ascent to the top of West Maroon Pass has around 850 feet elevation gain. There was one snow field you had to walk through, but it was frozen in the early morning. That last stretch at the end definitely got to my lungs with the incline, but thankfully, it was a shorter spurt of elevation gain. Once we got to the top, we were in awe of the views down into the valley.
Everything was so lush and green. The temperature had dipped pretty low, the night before, so there was some ice on the ground where there was more water, but it wasn’t anything substantial. You didn’t microspikes for any part of the loop (which we didn’t bring after seeing recent trail reports).
Once you get over the top of West Maroon pass, you have a couple miles before you reach Frigid Air Pass. When you’re almost 3 miles in, you will reach a junction in the trail. You will then take the Fravert Basin Trail #1974. The views to your left, looking down into the valley, makes you feel like you’re in the Sound of Music. It was beautiful.
The ascent up Frigid Air Pass was pretty rough and very steep. The dirt was loose and semi rocky, so I took a lot of breaks, and took my time. I cannot imagine doing this trip without trekking poles - for the ascents or descents.
At the top of Frigid Air Pass you will have spectacular views of Fravert Basin and you will see the backside of the Maroon Bells. As you descend down the switchbacks, into Fravert Basin, you will lose around 2,000 feet of elevation over the next few miles.
There was one snow field that we got to glissade down, which was so fun! When we were starting to hike down into the basin, we heard a pack of coyotes yipping, which was very strange during the day. We all made sure to stick close together, since we had Hank (Holly’s dog), just in case. Thankfully, we didn’t hear them again, or see them.
We stopped in Fravert Basin, had lunch, cooled our feet off in a stream, refilled our water, and continued down into the valley via switchbacks. It was stunning looking at it from above. It was lime green, you could see the river winding through, there were tall pines, and mountains in the distance. It truly looked like a Colorado postcard. The lighting was unfortunately not great, so my attempts to capture it were not ideal. When we got down into the meadow, I realized the river we took a break at, turned into a large waterfall that was thundering down into the valley.
Earlier in the day, another hiker told us to look out for a “field of flowers”. Thankfully, once we did the river crossing, put our shoes back on, and kept hiking, we knew exactly what she meant. There was a meadow filled with more Columbine than I’ve seen anywhere else, ever. It was stunning. There was also an abundance of Indian Paintbrush along this part of the trail and all over the 4PL. This was one of my favorite parts of the loop.
Once you’re about 5 miles into your day, you will start seeing campsites along the trail, to choose from. We were at a lower elevation, which was nice, and found a great camp spot a little further into the forest, where we could hear the river off in the distance.
I hardly slept the night before so I laid down in my tent, early. I started falling asleep when it was still daylight out. Thankfully, night two was the best night’s sleep I got (it still wasn’t great), and I would need it for day three.
Four Pass Loop: Day Three
July 9, 2024
Link to carousel post: https://www.instagram.com/p/C9tMnq7M52Z/?img_index=1
Link to carousel post: https://www.instagram.com/p/C9tbin9MDol/?img_index=1
We started off day three by waking up to some frost in the valley that we were camping in. We took our time and had a pretty slow start to the morning. We thought that day three would be our “easiest” day, because of mileage, and because the ascent was more gradual, but we were very wrong. Day three turned out to be the hardest day, by far. The ascent up Trail Rider Pass was tough.
The hike starts climbing along the Fravert Basin Trail #1974.The switchbacks go through beautiful aspen groves, which would be stunning in the fall. The views off into Hasley Basin, towards your left, looking at the Crystal River, are also gorgeous. When you reach the junction you’ll take a right and follow the North Cutoff Trail #1976 up the ridge towards Trail Rider Pass.
This trail meets up with the Geneva Lake Trail #1973. Take the Geneva Lakes Trail to the right, towards Trail Rider Pass. From this junction it’s a little over a mile to the top of Trail Rider Pass. Making our way up over the ridge was tough. When we got over it, I was in awe. There were small lakes and all of the rocks were so colorful and different. Holly and I stopped for some photos, and then we realized that the trail went sharply up to the left, to ascend up Trail Rider Pass. This was by far the worst part of the entire 4PL, in my opinion.
Once you’re at the top of the pass, you have breathtaking views of Snowmass Lake. The views heading up Trail Rider were stunning, but I was not prepared for how beautiful (and different) they would be on the descent towards Snowmass Lake. There were 2 snow crossings, on top of boulder fields, but they weren’t too bad. We didn’t bring microspikes and were fine using trekking poles.
The hike down to Snowmass Lake is around 2 miles. If you’re camping in the Snowmass Zone, you will take the left at the junction. There are several campsites in this area. If you are heading to Upper Snowmass zone to camp, you will take the right at the junction. Even if you are camping in Upper Snowmass, I definitely think it’s worth it to see Snowmass Lake from below.
Make sure to bring plenty of bug spray. The mosquitos were horrendous once we got about a mile away from the lake. I forgot to treat my gear with Picaridin, but I’ve heard that it really helps. We walked down to Snowmass Lake and took a dip. It was starting to get overcast, thunder, and was lightly sprinkling, but thankfully it wasn’t raining hard, and it wasn’t lightning.
After we got changed back into our hiking clothes we hiked out to find a camp spot. Since we got a later start that day, we were having trouble finding a spot. We found one that was less than ideal. It was in a super wooded area, with a lot of downed trees, and felt like a very good spot for bears.
None of us loved it, but we were so tired, ready to eat, and put up our tents. We got our tents set up, boiled water for dinner, and it started to rain. This was the only time we had actual rain on the trip and it didn’t last too long.
I did not sleep well and woke up around 4:15am to the sound of twigs snapping. I heard 4 footsteps and immediately started yelling to try and wake Holly and McKenzie up. I didn’t hear anything after those footsteps. It was definitely bigger than a raccoon, but it wasn’t loud enough for it to be a bear, so looking back on it, I wonder if it was a mountain lion. Given the time of day (dawn), how stealthy they can move, and the fact that they can jump up to 45 feet, it makes me a little freaked out. Thankfully, we were all fine, and our bear bins were also untouched when we got them a couple hours later.
Four Pass Loop: Day Four
July 10, 2024
Link to carousel post: https://www.instagram.com/p/C9v79POs7Vr/?img_index=1
On day four we were excited to head back to the trailhead. We got up pretty early to get out of the (semi sketchy) camp spot and get back on the trail. When you reach the junction of the Maroon Snowmass Trail #1975 you will take the trail towards Buckskin Pass.
We hiked up switchbacks which led into a beautiful valley. We had more cloud coverage than we had the previous 3 days, which was nice. Around 2 miles in, the trail begins to steadily climb up to Buckskin Pass. You will climb around 1700 feet and reach the top of the pass around 4 miles into the hike. Hiking up Buckskin Pass was challenging, but it wasn’t as bad as Trail Rider Pass, the day before. Looking over Buckskin Pass, into Minnehana Gulch, was beautiful.
Everyone warned about the cornice on Buckskin, so I wasn’t sure what to expect. By the time we got there, it wasn’t close to the trail at all, so we just hiked right by it. Once you reach the top of Buckskin, you will descend around 3,000 feet back down to the trailhead.
The Indian Paintbrush were beautiful as we descended into Minnehana Gulch. Everything was bright green and lush, but we were definitely keeping a faster pace than the days before, because we were ready to be off our feet, so I got less photos this day.
We got to the Crater Lake cutoff, and I forgot that we had almost 2 miles left, to get back to the car. It was significantly more crowded in that area, with a lot of day hikers going to Crater Lake. This portion of the trail would be really beautiful to go to in the fall because of all of the Aspen trees.
The 4PL was such an insane, but amazing experience, and I’m so glad I did it! The scenery was way more beautiful than I anticipated, we got perfect weather, and I’m so glad I got to go with McKenzie, Holly, and Hank. I think we were the only all female group - at least that I remember seeing on the trail. There were a lot of couples, various friend groups, and men in groups of 4. I have to admit, I do feel a little more badass after completing the 4PL.
Recommended Gear:
Below is a list of recommended gear for the Four Pass Loop based on my trip in July 2024.
This is my complete list with linked items, in the bullet points below. I am using commission links which give me a small percentage, at no extra cost to you. Your support in using them truly helps out!
Gear list: https://app.rockporch.com/llink/kOuwb1etRCyYt
Hiking Clothes:
A long sleeve shirt - synthetic or wool, no cotton (depending on the weather)
A short sleeve shirt - synthetic or wool, no cotton (depending on the weather)
2 pairs of hiking pants or leggings - synthetic or wool, no cotton
2 pairs of shorts
2 sports bras or tanks
2 pairs of underwear
2 pairs of wool socks
Gore Tex hiking boots or shoes
Camp Clothes:
Pajamas or base layers
Sandals (I used my water crossing shoes)
A beanie
Hiking Gear:
Water filtration system - on the go
Water filtration system - multi person
Water filtration system - at camp
Camp gear:
Lantern (optional)
Food:
Matches or a lighter
Optional: a pot
Gallon zip lock bag for trash
Stevia packets
Chips
Personal items:
KT tape for blisters
Small amount of duct tape for gear repairs
Chapstick
Ibuprofen, Aspirin, other medications
Contacts
Menstrual products
Hair tie + clear elastics
Nail file
Toilet paper
Glasses (optional)
Misc:
Hiking Permit (must be printed out)
ID
Electronics:
Phone charger cord

